Time for an update.
For radiator I was going to go with Baz's suggestion and get a series 3 bluebird. But after looking around there wasn't any available unless I wanted a brand new one. Living in Perth there is very few old cars getting around and wreckers don't keep any older vehicles anymore. I had the same issue finding a tailshaft. Ended up getting a VR one as that was the only thing I could find.
Back to the radiator I went and visited KYP (where I picked up the motor) and grabbed a S14 radiator which was buggered just to see if I could get that to fit. I was lucky that the rubbers that sit on the bottom pegs of the S14 radiator were still attached to the radiator. I found that the rubbers and pegs of the radiator fit straight down into the holes on the caster arm mounts. If you zoom in you can see the rubbers sitting in the holes.
![[ img ]](http://i1298.photobucket.com/albums/ag44/mrdatsun21/IMG_2803_zps8da4b75a.jpg)
You can see the fitment here. Just need to make a small bracket to go over the radiator pegs on the top tank and it will be mounted! I have ordered an alloy radiator which I'll modify the top hose point to point out sideways. I'll put up more pics of this once it's done. I'll be ordering a spal thermo to go in from Baz shortly.
![[ img ]](http://i1298.photobucket.com/albums/ag44/mrdatsun21/IMG_2804_zps2b421881.jpg)
I gave the rocker cover a bit of a birthday, with the old crinkle paint. I also polished the lettering just for good measure. Heres the finished product. I'm pretty happy with it.
![[ img ]](http://i1298.photobucket.com/albums/ag44/mrdatsun21/IMG_2844_zps1ad5dfe2.jpg)
And installed.
![[ img ]](http://i1298.photobucket.com/albums/ag44/mrdatsun21/IMG_2856_zpsb2b7ce00.jpg)
I got the computer and loom back ready for install. Extremely happy with the job. Had to cut a hole in the firewall for the loom to go through. I was thinking of just using the holes that the air con lines go through but I would like to install air con in the car so that was out of the question. I ended up cutting a hole to the left of the existing holes.
![[ img ]](http://i1298.photobucket.com/albums/ag44/mrdatsun21/IMG_2909_zpsc977850f.jpg)
Next was to mount the computer. I wanted to keep it well out of the way so it didn't get kicked. I got a bottle of gas for my tig welder. Make's doing jobs like this so much easier. I mounted it litterally right up behind the glove box.
![[ img ]](http://i1298.photobucket.com/albums/ag44/mrdatsun21/IMG_2911_zps9aba10b7.jpg)
Next was the fuse's/relays. Also wanted these out the way but also accessible. Though about mounting them in the tray under the glove box but then discovered theres the perfect spot just to the left. I have to cut the passenger kick panel slightly shorted but that's easy and the cut will be hidden. Here's the computer and fuse's mounted.
![[ img ]](http://i1298.photobucket.com/albums/ag44/mrdatsun21/IMG_2914_zps4c10df9a.jpg)
With glovebox and under dash tray reinstalled you wouldn't know they were there.
![[ img ]](http://i1298.photobucket.com/albums/ag44/mrdatsun21/IMG_2915_zpsc8b71c58.jpg)
So I've got both the engine and body looms sorted and wired up. I stripped all the redundant wiring out of the body loom, which included all the stuff from the carby. I've removed the fusable link and installed a maxi fuse. The wiring is 90 percent complete now. I've havn't wrapped it up just yet as I'm sure there'll be other stuff that needs to go in before it's completed.
Still so much to do. Waiting to get a surge tank and fuel pump from Baz. I've got to get the inlet sorted out. I have a 3 inch stainless elbow but need some pipe as well to make up a pipe to go across the front of the motor and I also want to make an airbox up for the LHS. Also have to finish of the handbrake cables under the car.
I'm also looking for an air con unit for a stanza if anyone has one. Mainly after the in car bit's as I've got the compressor etc. Let me know if you've got one or know where I can get one!
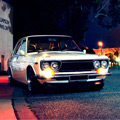
This is as the car sits now. Hanging to drive it. Especially after crusing down the freeway last weekend and seeing a white ke70 corolla!
![[ img ]](http://i1298.photobucket.com/albums/ag44/mrdatsun21/IMG_2855_zpsc76e1796.jpg)
![[ img ]](http://s1298.photobucket.com/user/mrdatsun21/media/IMG_2673_zps95de4ad0.jpg.html)
![[ img ]](http://s1298.photobucket.com/user/mrdatsun21/media/IMG_2676_zps2f110c19.jpg.html)
![[ img ]](http://s1298.photobucket.com/user/mrdatsun21/media/IMG_2680_zps1440205a.jpg.html)
![[ img ]](http://s1298.photobucket.com/user/mrdatsun21/media/IMG_2693_zpsc9371780.jpg.html)
![[ img ]](http://s1298.photobucket.com/user/mrdatsun21/media/IMG_2711_zps07d72840.jpg.html)
![[ img ]](http://s1298.photobucket.com/user/mrdatsun21/media/IMG_2729_zps95f789a8.jpg.html)
![[ img ]](http://s1298.photobucket.com/user/mrdatsun21/media/IMG_2736_zpsf8e2d1cc.jpg.html)
![[ img ]](http://s1298.photobucket.com/user/mrdatsun21/media/IMG_2739_zps42b43a9f.jpg.html)
![[ img ]](http://s1298.photobucket.com/user/mrdatsun21/media/IMG_2740_zps5bc01152.jpg.html)
![[ img ]](http://s1298.photobucket.com/user/mrdatsun21/media/IMG_2803_zps8da4b75a.jpg.html)
![[ img ]](http://s1298.photobucket.com/user/mrdatsun21/media/IMG_2804_zps2b421881.jpg.html)
![[ img ]](http://s1298.photobucket.com/user/mrdatsun21/media/IMG_2844_zps1ad5dfe2.jpg.html)
![[ img ]](http://s1298.photobucket.com/user/mrdatsun21/media/IMG_2856_zpsb2b7ce00.jpg.html)
![[ img ]](http://s1298.photobucket.com/user/mrdatsun21/media/IMG_2909_zpsc977850f.jpg.html)
![[ img ]](http://s1298.photobucket.com/user/mrdatsun21/media/IMG_2911_zps9aba10b7.jpg.html)
![[ img ]](http://s1298.photobucket.com/user/mrdatsun21/media/IMG_2914_zps4c10df9a.jpg.html)
![[ img ]](http://s1298.photobucket.com/user/mrdatsun21/media/IMG_2915_zpsc8b71c58.jpg.html)
![[ img ]](http://s1298.photobucket.com/user/mrdatsun21/media/IMG_2855_zpsc76e1796.jpg.html)
![[ img ]](http://s1298.photobucket.com/user/mrdatsun21/media/IMG_2927_zps94fa3a3c.jpg.html)
![[ img ]](http://s1298.photobucket.com/user/mrdatsun21/media/IMG_2928_zps4ccd929b.jpg.html)
![[ img ]](http://s1298.photobucket.com/user/mrdatsun21/media/IMG_3570_zpsjszcvja4.jpg.html)
![[ img ]](http://s1298.photobucket.com/user/mrdatsun21/media/IMG_3606_zpszmyxrdpq.jpg.html)
![[ img ]](http://s1298.photobucket.com/user/mrdatsun21/media/IMG_3640_zpsrfb6ikhe.jpg.html)
![[ img ]](http://s1298.photobucket.com/user/mrdatsun21/media/IMG_3644_zpshi7gr7qt.jpg.html)
![[ img ]](http://s1298.photobucket.com/user/mrdatsun21/media/IMG_3645_zpsbsopcwyf.jpg.html)
![[ img ]](http://s1298.photobucket.com/user/mrdatsun21/media/IMG_3622_zpss00jj3xb.jpg.html)
![[ img ]](http://s1298.photobucket.com/user/mrdatsun21/media/IMG_3615_zpsl8xfjrqh.jpg.html)