Hi friends…
Sorry for the silence obout my 1200’s restoration…it ended on the beggining of this month, August…I reached the main objective…
DattoA10: Thank you folk...Here are the latest photos...for you the last details...
Here are the latest photos and the latest videos…and a new and different life for my 1200!
It has a been a long duration restore project, it took almost two years but it’s astonishing, the car has all the original details and runs like a beast…
I want to thank you all that followed the project, that gave me advices, that commented all the steps and everyone who saw the car growing up! Thank you all!!!
Until the moment I’ve made almost 1000 km’s and next week the car will be calibrated for the next 2000 km’s and just then it will be made the last adjustments…
I hope you liked this project as much as I, and the most important, that you learned something as I did, and in third place that my project influenced more people to restore more cars…
This project was made with all my dedication, strength, patience, and I won thins like Mr. Vitorino friendship, great professional and big friend…
I want to thank my wife for all the support she gave me, and for all the bad moods I pass when something went wrong, Hugo Castelo for all the parts he get me, Luís Martins for the support, Mr. Vitorino wife, and Mr. Vitorino, without him the 1200 was not the same, Nissan dealers around the world, the ones from Portugal for helping me categorizing parts and for the searches, lots of phone calls and many hours in searching for material (microfilms and catalogs)…and all the persons envolved on the project…
Let’s see the Datsun…
OBRIGADO!
The trunk leather installed…
![[ img ]](http://www.ozdat.com/forum/imagecache/15868/imgshk/img268/7458/restaurodatsun002.jpg)
![[ img ]](http://www.ozdat.com/forum/imagecache/15868/imgshk/img44/6803/restaurodatsun003.jpg)
And finally…
![[ img ]](http://www.ozdat.com/forum/imagecache/15868/imgshk/img268/1910/restaurodatsun001.jpg)
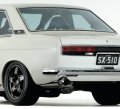
The rear window fixed with the chrome moldes…
![[ img ]](http://www.ozdat.com/forum/imagecache/15868/imgshk/img268/9440/restaurodatsun006.jpg)
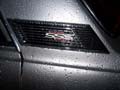
The original caps...
![[ img ]](http://www.ozdat.com/forum/imagecache/15868/imgshk/img38/3016/restaurodatsun008.jpg)
![[ img ]](http://www.ozdat.com/forum/imagecache/15868/imgshk/img44/1982/restaurodatsun010.jpg)
![[ img ]](http://www.ozdat.com/forum/imagecache/15868/imgshk/img38/9725/restaurodatsun013.jpg)
![[ img ]](http://www.ozdat.com/forum/imagecache/15868/imgshk/img268/8735/restaurodatsun016.jpg)
And finally…
![[ img ]](http://www.ozdat.com/forum/imagecache/15868/imgshk/img44/7062/restaurodatsun024.jpg)
![[ img ]](http://www.ozdat.com/forum/imagecache/15868/imgshk/img44/4791/restaurodatsun025.jpg)
![[ img ]](http://www.ozdat.com/forum/imagecache/15868/imgshk/img44/2055/restaurodatsun026.jpg)
![[ img ]](http://www.ozdat.com/forum/imagecache/15868/imgshk/img268/9482/restaurodatsun027.jpg)
Then a problem occurred, the Datsun protectors had to be done again, the first ones were not the indicted, the paint started to pull off before applying, so I repeated all the process and made a repaint…I think they became better than before…
![[ img ]](http://www.ozdat.com/forum/imagecache/15868/imgshk/img268/7910/restaurodatsun012.jpg)
![[ img ]](http://www.ozdat.com/forum/imagecache/15868/imgshk/img44/7466/restaurodatsun015.jpg)
![[ img ]](http://www.ozdat.com/forum/imagecache/15868/imgshk/img268/5972/restaurodatsun019.jpg)
Afterwards they were applied…fantastic…
![[ img ]](http://www.ozdat.com/forum/imagecache/15868/imgshk/img268/8070/restaurodatsun030.jpg)
![[ img ]](http://www.ozdat.com/forum/imagecache/15868/imgshk/img38/9296/restaurodatsun032.jpg)
![[ img ]](http://www.ozdat.com/forum/imagecache/15868/imgshk/img44/9296/restaurodatsun032.jpg)
![[ img ]](http://www.ozdat.com/forum/imagecache/15868/imgshk/img44/9197/restaurodatsun028.jpg)
The new washer bag filled up with desiled water, because the clore can damage the interior fo the bag…
![[ img ]](http://www.ozdat.com/forum/imagecache/15868/imgshk/img38/6248/restaurodatsun037.jpg)
The front lights were focus…
![[ img ]](http://www.ozdat.com/forum/imagecache/15868/imgshk/img38/8034/restaurodatsun034.jpg)
![[ img ]](http://www.ozdat.com/forum/imagecache/15868/imgshk/img38/4041/restaurodatsun035.jpg)
And we went on a ride to try it…first time complete outside the garage…I’ve waited many time for this…
![[ img ]](http://www.ozdat.com/forum/imagecache/15868/imgshk/img38/6386/restaurodatsun040.jpg)
![[ img ]](http://www.ozdat.com/forum/imagecache/15868/imgshk/img44/2259/restaurodatsun042.jpg)
After a few miles we return to the garage…
![[ img ]](http://www.ozdat.com/forum/imagecache/15868/imgshk/img44/3138/restaurodatsun046b.jpg)
![[ img ]](http://www.ozdat.com/forum/imagecache/15868/imgshk/img268/4514/restaurodatsun047.jpg)
![[ img ]](http://www.ozdat.com/forum/imagecache/15868/imgshk/img44/7920/restaurodatsun049.jpg)
![[ img ]](http://www.ozdat.com/forum/imagecache/15868/imgshk/img44/6592/restaurodatsun055.jpg)
![[ img ]](http://www.ozdat.com/forum/imagecache/15868/imgshk/img38/6226/restaurodatsun057.jpg)
![[ img ]](http://www.ozdat.com/forum/imagecache/15868/imgshk/img268/893/restaurodatsun058.jpg)
![[ img ]](http://www.ozdat.com/forum/imagecache/15868/imgshk/img268/2999/restaurodatsun059.jpg)
Luís appear and help us…he went to the supermarket and bought some beers…a well deserved ones…
![[ img ]](http://www.ozdat.com/forum/imagecache/15868/imgshk/img44/5656/restaurodatsun052.jpg)
And now the vídeos…hope you like!
YouTube - Datsun 1200 - 2 anos de restauro
YouTube - Datsun 1200 - Primeiros Km's...
YouTube - 1ª volta com o Datsun
YouTube - Datsun 1200 - Fast as a Shark
The car went for the inspection centre on next Monday…no problem, it pass with no observation!
The employees of the centre asked so many questions, I spent with them more than an hour talking about aspects of the car!!!
Mr. Vitorino working on the ropes…
![[ img ]](http://www.ozdat.com/forum/imagecache/15868/imgshk/img37/6803/restaurodatsun003.jpg)
And then the voyage to Portalegre…
![[ img ]](http://www.ozdat.com/forum/imagecache/15868/imgshk/img171/3508/restaurodatsun004.jpg)
![[ img ]](http://www.ozdat.com/forum/imagecache/15868/imgshk/img37/1910/restaurodatsun001.jpg)
![[ img ]](http://www.ozdat.com/forum/imagecache/15868/imgshk/img37/7458/restaurodatsun002.jpg)
First the tyres were calibrated, and at last the steering…
Next step the inspection centre…
![[ img ]](http://www.ozdat.com/forum/imagecache/15868/imgshk/img37/6600/restaurodatsun007.jpg)
![[ img ]](http://www.ozdat.com/forum/imagecache/15868/imgshk/img99/706/restaurodatsun009.jpg)
![[ img ]](http://www.ozdat.com/forum/imagecache/15868/imgshk/img171/1982/restaurodatsun010.jpg)
They didn’t allowed me to take photos inside, but no problem, I understand…
![[ img ]](http://www.ozdat.com/forum/imagecache/15868/imgshk/img99/8352/restaurodatsun011.jpg)
Mr. Vitorino and a friend talking…
![[ img ]](http://www.ozdat.com/forum/imagecache/15868/imgshk/img99/7910/restaurodatsun012.jpg)
After inspection a new batery was installed…the trims and holders are new too…
![[ img ]](http://www.ozdat.com/forum/imagecache/15868/imgshk/img37/9725/restaurodatsun013.jpg)
And the final…total victory…new car…
Me and Mr. Vitorino…a well deserved photo…
![[ img ]](http://www.ozdat.com/forum/imagecache/15868/imgshk/img37/2183/restaurodatsun014.jpg)
![[ img ]](http://www.ozdat.com/forum/imagecache/15868/imgshk/img37/5193/restaurodatsun018.jpg)
And the car in my garage…
![[ img ]](http://www.ozdat.com/forum/imagecache/15868/imgshk/img37/5516/restaurodatsun021.jpg)
Lefting Vitorino’s garage to home…
YouTube - Restauro Datsun 019
I want to say that this Project has not ended yet, because perfection didn’t exist. I will continue with some details…and the most important, a photographic session…
Thank you all again!!!
Mário
Ps: I’m searching for another Datsun to start a new project…I didn’t decide the model yet, but a 510 sss can be a good and nice choice, don’t know!!!
![[ img ]](http://www.ozdat.com/forum/imagecache/15868/imgshk/img212/9585/1001805.jpg)
![[ img ]](http://www.ozdat.com/forum/imagecache/15868/imgshk/img527/9964/1001812.jpg)
![[ img ]](http://www.ozdat.com/forum/imagecache/15868/imgshk/img527/8634/1001810o.jpg)
![[ img ]](http://www.ozdat.com/forum/imagecache/15868/imgshk/img212/9490/1001809.jpg)
![[ img ]](http://www.ozdat.com/forum/imagecache/15868/imgshk/img9/5617/1001814.jpg)
![[ img ]](http://www.ozdat.com/forum/imagecache/15868/imgshk/img527/4610/1001816i.jpg)
![[ img ]](http://www.ozdat.com/forum/imagecache/15868/imgshk/img527/1502/1001815.jpg)
![[ img ]](http://www.ozdat.com/forum/imagecache/15868/imgshk/img527/2642/1001817z.jpg)
![[ img ]](http://www.ozdat.com/forum/imagecache/15868/imgshk/img9/5438/1001818.jpg)
![[ img ]](http://www.ozdat.com/forum/imagecache/15868/imgshk/img212/5938/1001819.jpg)
![[ img ]](http://www.ozdat.com/forum/imagecache/15868/imgshk/img527/2599/1001820.jpg)
![[ img ]](http://www.ozdat.com/forum/imagecache/15868/imgshk/img212/8715/1001821.jpg)
![[ img ]](http://www.ozdat.com/forum/imagecache/15868/imgshk/img212/5958/1001825.jpg)
![[ img ]](http://www.ozdat.com/forum/imagecache/15868/imgshk/img212/8383/1001826.jpg)
![[ img ]](http://www.ozdat.com/forum/imagecache/15868/imgshk/img9/9259/1001829.jpg)
![[ img ]](http://www.ozdat.com/forum/imagecache/15868/imgshk/img212/5994/1001830.jpg)
![[ img ]](http://www.ozdat.com/forum/imagecache/15868/imgshk/img527/6817/1001832.jpg)
![[ img ]](http://www.ozdat.com/forum/imagecache/15868/imgshk/img212/4110/1001833.jpg)
![[ img ]](http://www.ozdat.com/forum/imagecache/15868/imgshk/img212/4383/1001834.jpg)

![[ img ]](http://www.ozdat.com/forum/imagecache/15868/imgshk/img365/209/datsun1200filter.jpg)
![[ img ]](http://www.ozdat.com/forum/imagecache/15868/imgshk/img365/8927/datsun1200filterx.jpg)
![[ img ]](http://www.ozdat.com/forum/imagecache/15868/imgshk/img209/5696/datsun1200radiador.jpg)
![[ img ]](http://www.ozdat.com/forum/imagecache/15868/imgshk/img23/5076/datsun1200cabeca.jpg)
![[ img ]](http://www.ozdat.com/forum/imagecache/15868/imgshk/img23/9357/datsun1200t.jpg)
![[ img ]](http://www.ozdat.com/forum/imagecache/15868/imgshk/img209/9144/datsun1200tubo3.jpg)
![[ img ]](http://www.ozdat.com/forum/imagecache/15868/imgshk/img23/2036/datsun1200tubo.jpg)
![[ img ]](http://www.ozdat.com/forum/imagecache/15868/imgshk/img365/8813/datsun1200tubo2.jpg)
![[ img ]](http://www.ozdat.com/forum/imagecache/15868/imgshk/img209/5389/datsun1200fechadura1.jpg)
![[ img ]](http://www.ozdat.com/forum/imagecache/15868/imgshk/img23/6694/datsun1200fechadura2.jpg)
![[ img ]](http://www.ozdat.com/forum/imagecache/15868/imgshk/img209/1827/datsun1200gourmet3.jpg)
![[ img ]](http://www.ozdat.com/forum/imagecache/15868/imgshk/img23/7213/datsun1200gourmet2.jpg)
![[ img ]](http://www.ozdat.com/forum/imagecache/15868/imgshk/img365/8913/datsun1200gourmet.jpg)
![[ img ]](http://www.ozdat.com/forum/imagecache/15868/imgshk/img209/6421/datsun1200moca.jpg)
![[ img ]](http://www.ozdat.com/forum/imagecache/15868/imgshk/img209/1765/datsun1200isolantechape.jpg)
![[ img ]](http://www.ozdat.com/forum/imagecache/15868/imgshk/img365/9017/datsun1200chapeleira.jpg)
![[ img ]](http://www.ozdat.com/forum/imagecache/15868/imgshk/img23/6007/datsun1200saco.jpg)
![[ img ]](http://www.ozdat.com/forum/imagecache/15868/imgshk/img23/8520/datsun1200gearbox.jpg)
![[ img ]](http://www.ozdat.com/forum/imagecache/15868/imgshk/img365/2797/datsun1200.jpg)
![[ img ]](http://www.ozdat.com/forum/imagecache/15868/imgshk/img257/7458/restaurodatsun002.jpg)
![[ img ]](http://www.ozdat.com/forum/imagecache/15868/imgshk/img525/3508/restaurodatsun004.jpg)
![[ img ]](http://www.ozdat.com/forum/imagecache/15868/imgshk/img525/6600/restaurodatsun007.jpg)
![[ img ]](http://www.ozdat.com/forum/imagecache/15868/imgshk/img525/9440/restaurodatsun006.jpg)
![[ img ]](http://www.ozdat.com/forum/imagecache/15868/imgshk/img254/8735/restaurodatsun016.jpg)
![[ img ]](http://www.ozdat.com/forum/imagecache/15868/imgshk/img257/8610/restaurodatsun008w.jpg)
![[ img ]](http://www.ozdat.com/forum/imagecache/15868/imgshk/img525/7466/restaurodatsun015.jpg)
![[ img ]](http://www.ozdat.com/forum/imagecache/15868/imgshk/img525/7910/restaurodatsun012.jpg)
![[ img ]](http://www.ozdat.com/forum/imagecache/15868/imgshk/img254/8352/restaurodatsun011.jpg)
![[ img ]](http://www.ozdat.com/forum/imagecache/15868/imgshk/img204/9049/tuboagua.jpg)
![[ img ]](http://www.ozdat.com/forum/imagecache/15868/imgshk/img11/7955/restaurodatsun026jw2.jpg)
![[ img ]](http://www.ozdat.com/forum/imagecache/15868/imgshk/img201/8048/caixa2.jpg)
![[ img ]](http://www.ozdat.com/forum/imagecache/15868/imgshk/img204/7027/caixa3.jpg)
![[ img ]](http://www.ozdat.com/forum/imagecache/15868/imgshk/img201/3544/caixax.jpg)
![[ img ]](http://www.ozdat.com/forum/imagecache/15868/imgshk/img204/6601/farol.jpg)
![[ img ]](http://www.ozdat.com/forum/imagecache/15868/imgshk/img201/407/faroldentro.jpg)
![[ img ]](http://www.ozdat.com/forum/imagecache/15868/imgshk/img80/7051/farolfora.jpg)
![[ img ]](http://www.ozdat.com/forum/imagecache/15868/imgshk/img201/7365/restaurodatsun005.jpg)
![[ img ]](http://www.ozdat.com/forum/imagecache/15868/imgshk/img80/8376/interior2e.jpg)
![[ img ]](http://www.ozdat.com/forum/imagecache/15868/imgshk/img204/2092/interioru.jpg)
![[ img ]](http://www.ozdat.com/forum/imagecache/15868/imgshk/img80/7089/vidrolateral.jpg)
![[ img ]](http://www.ozdat.com/forum/imagecache/15868/imgshk/img201/8324/restaurodatsun023.jpg)
![[ img ]](http://www.ozdat.com/forum/imagecache/15868/imgshk/img10/2112/1002320a.jpg)
![[ img ]](http://www.ozdat.com/forum/imagecache/15868/imgshk/img254/9342/1002321.jpg)
![[ img ]](http://www.ozdat.com/forum/imagecache/15868/imgshk/img80/3079/suspenso2.jpg)
![[ img ]](http://www.ozdat.com/forum/imagecache/15868/imgshk/img201/1912/suspenso.jpg)
![[ img ]](http://www.ozdat.com/forum/imagecache/15868/imgshk/img201/8599/pala2.jpg)
![[ img ]](http://www.ozdat.com/forum/imagecache/15868/imgshk/img204/6406/pala.jpg)
![[ img ]](http://www.ozdat.com/forum/imagecache/15868/imgshk/img259/1910/restaurodatsun001.jpg)
![[ img ]](http://www.ozdat.com/forum/imagecache/15868/imgshk/img512/7458/restaurodatsun002.jpg)
![[ img ]](http://www.ozdat.com/forum/imagecache/15868/imgshk/img364/3508/restaurodatsun004.jpg)
![[ img ]](http://www.ozdat.com/forum/imagecache/15868/imgshk/img259/706/restaurodatsun009.jpg)
![[ img ]](http://www.ozdat.com/forum/imagecache/15868/imgshk/img259/8352/restaurodatsun011.jpg)
![[ img ]](http://www.ozdat.com/forum/imagecache/15868/imgshk/img364/6600/restaurodatsun007.jpg)
![[ img ]](http://www.ozdat.com/forum/imagecache/15868/imgshk/img259/9440/restaurodatsun006.jpg)
![[ img ]](http://www.ozdat.com/forum/imagecache/15868/imgshk/img364/3016/restaurodatsun008.jpg)
![[ img ]](http://www.ozdat.com/forum/imagecache/15868/imgshk/img259/5822/restaurodatsun054.jpg)
![[ img ]](http://www.ozdat.com/forum/imagecache/15868/imgshk/img364/1286/restaurodatsun053.jpg)
![[ img ]](http://www.ozdat.com/forum/imagecache/15868/imgshk/img259/893/restaurodatsun058.jpg)
![[ img ]](http://www.ozdat.com/forum/imagecache/15868/imgshk/img512/7910/restaurodatsun012.jpg)
![[ img ]](http://www.ozdat.com/forum/imagecache/15868/imgshk/img512/8735/restaurodatsun016.jpg)
![[ img ]](http://www.ozdat.com/forum/imagecache/15868/imgshk/img266/7466/restaurodatsun015.jpg)
![[ img ]](http://www.ozdat.com/forum/imagecache/15868/imgshk/img512/5193/restaurodatsun018.jpg)
![[ img ]](http://www.ozdat.com/forum/imagecache/15868/imgshk/img512/2844/restaurodatsun020.jpg)
![[ img ]](http://www.ozdat.com/forum/imagecache/15868/imgshk/img512/9296/restaurodatsun032.jpg)
![[ img ]](http://www.ozdat.com/forum/imagecache/15868/imgshk/img259/3389/restaurodatsun017.jpg)
![[ img ]](http://www.ozdat.com/forum/imagecache/15868/imgshk/img259/9482/restaurodatsun027.jpg)
![[ img ]](http://www.ozdat.com/forum/imagecache/15868/imgshk/img512/8290/restaurodatsun029.jpg)
![[ img ]](http://www.ozdat.com/forum/imagecache/15868/imgshk/img512/346/restaurodatsun022.jpg)
![[ img ]](http://www.ozdat.com/forum/imagecache/15868/imgshk/img259/5516/restaurodatsun021.jpg)
![[ img ]](http://www.ozdat.com/forum/imagecache/15868/imgshk/img259/5968/restaurodatsun031.jpg)
![[ img ]](http://www.ozdat.com/forum/imagecache/15868/imgshk/img259/9197/restaurodatsun028.jpg)
![[ img ]](http://www.ozdat.com/forum/imagecache/15868/imgshk/img412/6248/restaurodatsun037.jpg)
![[ img ]](http://www.ozdat.com/forum/imagecache/15868/imgshk/img364/1355/restaurodatsun036.jpg)
![[ img ]](http://www.ozdat.com/forum/imagecache/15868/imgshk/img266/8034/restaurodatsun034.jpg)
![[ img ]](http://www.ozdat.com/forum/imagecache/15868/imgshk/img259/6281/restaurodatsun033.jpg)
![[ img ]](http://www.ozdat.com/forum/imagecache/15868/imgshk/img259/9571/restaurodatsun043.jpg)
![[ img ]](http://www.ozdat.com/forum/imagecache/15868/imgshk/img266/8004/restaurodatsun044.jpg)
![[ img ]](http://www.ozdat.com/forum/imagecache/15868/imgshk/img266/7920/restaurodatsun049.jpg)
![[ img ]](http://www.ozdat.com/forum/imagecache/15868/imgshk/img412/1759/restaurodatsun050.jpg)
![[ img ]](http://www.ozdat.com/forum/imagecache/15868/imgshk/img266/939/restaurodatsun051.jpg)
![[ img ]](http://www.ozdat.com/forum/imagecache/15868/imgshk/img259/7665/restaurodatsun064.jpg)
![[ img ]](http://www.ozdat.com/forum/imagecache/15868/imgshk/img412/2580/restaurodatsun061.jpg)
![[ img ]](http://www.ozdat.com/forum/imagecache/15868/imgshk/img412/7062/restaurodatsun024.jpg)
![[ img ]](http://www.ozdat.com/forum/imagecache/15868/imgshk/img259/6386/restaurodatsun040.jpg)
![[ img ]](http://www.ozdat.com/forum/imagecache/15868/imgshk/img259/9829/restaurodatsun041.jpg)
![[ img ]](http://www.ozdat.com/forum/imagecache/15868/imgshk/img259/6494/restaurodatsun065.jpg)
![[ img ]](http://www.ozdat.com/forum/imagecache/15868/imgshk/img196/1910/restaurodatsun001.jpg)
![[ img ]](http://www.ozdat.com/forum/imagecache/15868/imgshk/img5/6281/restaurodatsun033.jpg)
![[ img ]](http://www.ozdat.com/forum/imagecache/15868/imgshk/img5/8034/restaurodatsun034.jpg)
![[ img ]](http://www.ozdat.com/forum/imagecache/15868/imgshk/img196/4041/restaurodatsun035.jpg)
![[ img ]](http://www.ozdat.com/forum/imagecache/15868/imgshk/img5/1355/restaurodatsun036.jpg)
![[ img ]](http://www.ozdat.com/forum/imagecache/15868/imgshk/img14/9829/restaurodatsun041.jpg)
![[ img ]](http://www.ozdat.com/forum/imagecache/15868/imgshk/img14/2259/restaurodatsun042.jpg)
![[ img ]](http://www.ozdat.com/forum/imagecache/15868/imgshk/img196/3508/restaurodatsun004.jpg)
![[ img ]](http://www.ozdat.com/forum/imagecache/15868/imgshk/img14/7458/restaurodatsun002.jpg)
![[ img ]](http://www.ozdat.com/forum/imagecache/15868/imgshk/img14/6386/restaurodatsun040.jpg)
![[ img ]](http://www.ozdat.com/forum/imagecache/15868/imgshk/img14/9571/restaurodatsun043.jpg)
![[ img ]](http://www.ozdat.com/forum/imagecache/15868/imgshk/img5/2844/restaurodatsun020.jpg)
![[ img ]](http://www.ozdat.com/forum/imagecache/15868/imgshk/img196/5516/restaurodatsun021.jpg)
![[ img ]](http://www.ozdat.com/forum/imagecache/15868/imgshk/img14/6600/restaurodatsun007.jpg)
![[ img ]](http://www.ozdat.com/forum/imagecache/15868/imgshk/img14/9440/restaurodatsun006.jpg)
![[ img ]](http://www.ozdat.com/forum/imagecache/15868/imgshk/img196/7365/restaurodatsun005.jpg)
![[ img ]](http://www.ozdat.com/forum/imagecache/15868/imgshk/img14/3016/restaurodatsun008.jpg)
![[ img ]](http://www.ozdat.com/forum/imagecache/15868/imgshk/img14/9725/restaurodatsun013.jpg)
![[ img ]](http://www.ozdat.com/forum/imagecache/15868/imgshk/img5/1982/restaurodatsun010.jpg)
![[ img ]](http://www.ozdat.com/forum/imagecache/15868/imgshk/img14/8352/restaurodatsun011.jpg)
![[ img ]](http://www.ozdat.com/forum/imagecache/15868/imgshk/img14/7910/restaurodatsun012.jpg)
![[ img ]](http://www.ozdat.com/forum/imagecache/15868/imgshk/img5/9197/restaurodatsun028.jpg)
![[ img ]](http://www.ozdat.com/forum/imagecache/15868/imgshk/img5/7466/restaurodatsun015.jpg)
![[ img ]](http://www.ozdat.com/forum/imagecache/15868/imgshk/img196/5193/restaurodatsun018.jpg)
![[ img ]](http://www.ozdat.com/forum/imagecache/15868/imgshk/img5/5972/restaurodatsun019.jpg)
![[ img ]](http://www.ozdat.com/forum/imagecache/15868/imgshk/img196/7062/restaurodatsun024.jpg)
![[ img ]](http://www.ozdat.com/forum/imagecache/15868/imgshk/img14/8070/restaurodatsun030.jpg)
![[ img ]](http://www.ozdat.com/forum/imagecache/15868/imgshk/img5/9296/restaurodatsun032.jpg)
![[ img ]](http://www.ozdat.com/forum/imagecache/15868/imgshk/img5/5968/restaurodatsun031.jpg)
![[ img ]](http://www.ozdat.com/forum/imagecache/15868/imgshk/img196/5822/restaurodatsun054.jpg)
![[ img ]](http://www.ozdat.com/forum/imagecache/15868/imgshk/img196/6592/restaurodatsun055.jpg)
![[ img ]](http://www.ozdat.com/forum/imagecache/15868/imgshk/img5/1759/restaurodatsun050.jpg)
![[ img ]](http://www.ozdat.com/forum/imagecache/15868/imgshk/img5/8537/restaurodatsun046.jpg)
![[ img ]](http://www.ozdat.com/forum/imagecache/15868/imgshk/img14/939/restaurodatsun051.jpg)
![[ img ]](http://www.ozdat.com/forum/imagecache/15868/imgshk/img196/5656/restaurodatsun052.jpg)