Ozdat Home Feature Cars Ozdat Classifieds Event Calander Links Trade Link Tech Resource Merchandise Donate Web Mail
It is currently Sun Apr 28, 2024 9:53 am

All times are UTC+11:00


Post new topic  Reply to topic  [ 58 posts ]  Go to page « 1 2 3 4 »
Author Message
PostPosted: Fri Aug 17, 2012 9:29 am 
Offline
User avatar

Joined: Mon Jul 30, 2012 3:56 pm
Posts: 45
Location: cairns
180bssst appreciate the feedback!
Have got mixed reviews on the su's but for now I will run with them as its only going to be a mild engine anyway.. Just want a little poke for a nice clean weekender!
Still a little lost as to if the things blocked off are needed or not?
I have got fuel, dizzy, vacuum soughted.. Just where to plumb the pcv?? As its fairly large?
And as for the charcoal can bister I figure if I weld a small nozzle onto the back of the right air filter I can "vent" all excess through the guts and straight out the exhaust!

Have been looking at suspension.. Have been looking at ALOT of things haha.. Just want to get engine soughted first! But the rest will come..

Cheers

_________________
.
Current project 1975 180b
http://ozdat.com/forum/viewtopic.php?f=33&t=29304


Top
   
PostPosted: Fri Aug 17, 2012 10:18 am 
Offline
Guru
User avatar

Joined: Tue Mar 04, 2003 10:09 am
Posts: 2596
Location: Lonsdale, South Australia
75dat180 wrote:
Getting into it again this weekend.. Been short of time!
And still waiting for parts to show up!
Spoke to crow cam today and probably going to send them my cam to re grind it instead of buying new.. Still tossing up!!

Still need help with above post too..

Cheers
Do not go for a crow, I have said this before & I will reiterate.

IMHO as far as L series cams go. Crow make great cams for 2 stroke lawn mowers.

For your engine & budget a SSS or Stanza or L20B cam set correctly will be a suitable low cost upgrade.
Will shift the powerband up another 400 or so RPM. Those flat tops hitachis are difficult enough to get right without
the complexity of an increased overlap camshaft.

_________________
A little knowledge is a dangerous thing.
www.datsport.com

"R.I.P. Baz. 29 April 2022. Thank you for all your contributions to the Datsun community over the years. You will be missed." - OZDAT


Top
   
PostPosted: Fri Aug 17, 2012 10:26 am 
Offline
User avatar

Joined: Mon Jul 30, 2012 3:56 pm
Posts: 45
Location: cairns
:shock: 10/4 on that one!!
The more I get back the more I think I should flick these su's :cry:

_________________
.
Current project 1975 180b
http://ozdat.com/forum/viewtopic.php?f=33&t=29304


Top
   
PostPosted: Sun Aug 19, 2012 1:27 am 
Offline
User avatar

Joined: Fri Apr 18, 2008 11:51 pm
Posts: 284
Location: Melbourne Eastern
OK, PCV (Positive Crankcase Ventillation) hoses:

The one to the top of your rocker cover went to your air cleaner. With your new twin air cleaner assemblies you could plumb it to a small aftermarket breather filter from somewhere like Supercheap. The pipe from your engine block goes to the PCV valve, which is mounted on the balance pipe of your intake manifold.

From what I can see in your photos I'd try running thes carbs with the pipes blocked off as they are. If you detect any vacuum leaks (spray some carby cleaner on 'em while it's running and if the idle changes, you have a leak to seal) fix 'em. These are a simple set of SU type carbies with some extra stuff on 'em so if you get the basics right it should run OK.

The basics include:
No vacuum leaks (especially from worn throttle shafts)
Float levels set correctly (with floats + needle & seat valves in good condition)
Correct oil at correct level in the dampers
Pistons moving freely
Straight needles
Synchronising adjustment of mixture nuts and throttle butterflies
Ensuring choke works correctly and together on both carbies

If they're all good, you can balance them yourself- there're plenty of write-ups about how to do it. It can be fun and your mates will think you're some kind of Jedi master with old cars.

Cheers!


Top
   
PostPosted: Tue Aug 21, 2012 8:38 pm 
Offline
User avatar

Joined: Mon Jul 30, 2012 3:56 pm
Posts: 45
Location: cairns
180bsst mate you are a champion.. appreciate all the help

got this little bad boy delivered this morning... 3 core aluminium radiator
fingers crossed a few more things turn up this week as i have the weekend
free and am hoping to put some decent time into the old girl..
Attachment:
[ attachment ]
radiator.jpg [ 302.37 KiB | Viewed 2304 times ]
also just a couple of other pictures that i missed out on a little earlier..
front left gaurd removed as it was well beyond repair.. was a MISSION to get off as the two lower bolts were completely rusted!!
Attachment:
[ attachment ]
IMG_1096.JPG [ 294.2 KiB | Viewed 2304 times ]

and a clearer picture of the interior once it was removed
Attachment:
[ attachment ]
IMG_1132.JPG [ 294.19 KiB | Viewed 2304 times ]

cheers

_________________
.
Current project 1975 180b
http://ozdat.com/forum/viewtopic.php?f=33&t=29304


Top
   
PostPosted: Thu Aug 23, 2012 1:32 am 
Offline
User avatar

Joined: Fri Apr 18, 2008 11:51 pm
Posts: 284
Location: Melbourne Eastern
When replacing the guard you may want to use stainless steel bolts with a bit of anti-seize compound (so you never have the same problem with that guard again). I did with mine.
BTW, nice radiator.

Cheers!


Top
   
PostPosted: Sat Aug 25, 2012 5:02 pm 
Offline
User avatar

Joined: Mon Jul 30, 2012 3:56 pm
Posts: 45
Location: cairns
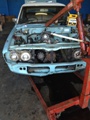
so.. i lost my mind this week and had a little brain fart..
and this is what resulted..
Attachment:
[ attachment ]
IMG_1191.JPG [ 263.61 KiB | Viewed 2293 times ]
haha i figured if i am going to go to the trouble of being as fussy as i am so far.. i may as well keep up the trend and make sure eveything is done right. :cheers

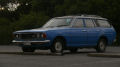
NO!! i am not changing the engine.. i really want to keep the 18 and just have a neat cruiser with a little bit of extra punch.

Seeing as I had nothing planned for the weekend i was up at 7 and down to the trusty work depot to start ripping into things.. as I hate to muck around and delay when i know what i want/has to be done. yesterday i picked up an engine stand from super cheap on sale for 64 bucks haha which i was rather impressed with and hired a hoist as this whole "why not just pull the engine out was a last minute decision
With a bit of fiddling around and disconnecting everything it wasn't toooooo hard to get out haha :shock: even though i took the lazy option to keep the transmisson in place.. things got a bit tight at times and had to drop back down to change the chain position.
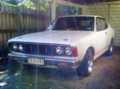
I am still extremely happy with how much rust is NOT turning up. but still crossing my fingers as the wire wheel and sand paper comes out (touch wood :? )
Ended up getting a hold of a front right gaurd (which is not needed..yet), front bumper is mint condition and stone tray for 200 bucks off the forums so all that should turn up early next week. That will aaaaaalmost wrap up everything i need for the body.. i hope!!!!

This, by the way, is my very first engine pull :? and with a little help from one of the boys it went pretty damn well
(and yes.. that is a **** load of transmission fluid hahaha im still learning :thumbsup: )
Attachment:
[ attachment ]
IMG_1183.JPG [ 239.44 KiB | Viewed 2293 times ]
Attachment:
[ attachment ]
IMG_1184.JPG [ 259.54 KiB | Viewed 2293 times ]
Attachment:
[ attachment ]
IMG_1186.JPG [ 288.73 KiB | Viewed 2293 times ]
Attachment:
[ attachment ]
IMG_1189.JPG [ 250.27 KiB | Viewed 2293 times ]
Attachment:
[ attachment ]
IMG_1192.JPG [ 221.76 KiB | Viewed 2293 times ]

_________________
.
Current project 1975 180b
http://ozdat.com/forum/viewtopic.php?f=33&t=29304


Top
   
PostPosted: Sun Aug 26, 2012 1:24 am 
Offline
User avatar

Joined: Fri Apr 18, 2008 11:51 pm
Posts: 284
Location: Melbourne Eastern
Good luck with this- you're sprinting up that learning curve. When I try stuff myself rather than paying big dollars to get somebody to do it for me it helps to remember: Professionals built the Titanic. Amateurs built the Ark.

Another tip- my old stock SSS revved better without the plastic engine fan. A nice electric one on your new radiator could be good. A couple of guidelines: fans work better PULLING air through a radiator than pushing it and a good fan shroud improves efficiency greatly. That gets us into wiring. Use a relay and ideally a temperature switch in the circuit. there's lots of ways of doing it. If you need help, just ask.

Cheers!


Top
   
PostPosted: Sun Aug 26, 2012 12:55 pm 
Offline
User avatar

Joined: Mon Jul 30, 2012 3:56 pm
Posts: 45
Location: cairns
Loved every second of it haha all my other cars I have paid people to do things so I will be proud of this one once she is done! Saying that.. Am having someone else sought the rust in the sills and paint..
When I removed the fan I thought an upgrade would be in order as the standard one is a poxy little thing! What's a good place to source a replacement?
I will also be relocating the transmission coolant as the new radiator doesn't have the old school outlet on the bottom (thank god.. It was ugly)
Battery will be going to the boot and rewiring everything as it looks like a massive spider web and seems as though previous owner had a crack at it (horribly) and there are wires going to NOTHING!

Getting one of the boys to compression test the engine this week to see how it is..

_________________
.
Current project 1975 180b
http://ozdat.com/forum/viewtopic.php?f=33&t=29304


Top
   
PostPosted: Tue Aug 28, 2012 9:34 pm 
Offline
User avatar

Joined: Mon Jul 30, 2012 3:56 pm
Posts: 45
Location: cairns
got some more fun delivered this morning
Attachment:
[ attachment ]
IMG_1194.JPG [ 270.96 KiB | Viewed 2273 times ]
picked these up in the forums.. a random find from a post over a year ago so i was EXTREMELY stoked that he still had them!!
front bar is in great condition but i will need to re-chrome it. And the other important thing i needed was the stone tray which just needs to be stripped back and repainted :D and i dont need the right gaurd but it might come in handy one day!!

I now only need a couple more small things and i have got the body side of these soughted :thumbsup:

building up quite the collection now though hahaha
Attachment:
[ attachment ]
IMG_1195.JPG [ 290.53 KiB | Viewed 2273 times ]

_________________
.
Current project 1975 180b
http://ozdat.com/forum/viewtopic.php?f=33&t=29304


Top
   
PostPosted: Fri Aug 31, 2012 7:30 am 
Offline
User avatar

Joined: Mon Jul 30, 2012 3:56 pm
Posts: 45
Location: cairns
Need a bit of help..
When removing the left gaurd the bottom two screws were badly rusted and I can get them out..
What's the easiest way? If I cut off the heads the thread will be stuck in there??
Just not sure..

Cheers

_________________
.
Current project 1975 180b
http://ozdat.com/forum/viewtopic.php?f=33&t=29304


Top
   
PostPosted: Wed Sep 05, 2012 12:52 am 
Offline
User avatar

Joined: Sun Apr 20, 2008 3:22 pm
Posts: 560
Location: southern adelaide
just drill the heads out mate buy new clips and bolts the bolts go into spring bolt washers you then can squeeze them open pull the bolts out on the clip ,,,,, just like the ones old holden guards are mounted on with in style

_________________
1600s arent the only datsun


Top
   
PostPosted: Thu Sep 06, 2012 4:03 pm 
Offline
User avatar

Joined: Mon Jul 30, 2012 3:56 pm
Posts: 45
Location: cairns
Does aaaaanyone know where I can get my hands on a new or close to new original auto shifter?

_________________
.
Current project 1975 180b
http://ozdat.com/forum/viewtopic.php?f=33&t=29304


Top
   
PostPosted: Tue Sep 11, 2012 10:18 am 
Offline
User avatar

Joined: Mon Jul 30, 2012 3:56 pm
Posts: 45
Location: cairns
Hey guys.. Ripped the thermo housing off the engine last night and
Looking from the outside there is a decent layer of rusty scum on the inside of the opening which doesn't thin out at all. I'm guessing it's from the s****y radiator flowing crap water through it.
Is this a major concern? Or can it be flushed out?

_________________
.
Current project 1975 180b
http://ozdat.com/forum/viewtopic.php?f=33&t=29304


Top
   
PostPosted: Tue Sep 11, 2012 11:57 am 
Offline
User avatar

Joined: Wed May 16, 2007 2:18 pm
Posts: 925
Location: Melbourne Doncaster
When i did the welsh plugs on my engine i was scooping up piles of rusty gunk from the engine block... Though it never had overheating problems so i guess it wasnt the biggest issue. Radiator flush is hardly going to make it worse though it dosent seem to completly get rid of that stuff. the other thing you can do is get some flyscreen mesh stuff and just wrap it over the inlet of the radiator and then put the hose back over the top and it acts as a crude kind of filter, then clean it out every now and again.

_________________
My garage:
180b sedan daily (needs some TLC)
180B sss (under restoration)
180b Wagon daily
http://ozdat.com/forum/viewtopic.php?f= ... 9&start=30


Top
   
Display posts from previous:  Sort by  
Post new topic  Reply to topic  [ 58 posts ]  Go to page « 1 2 3 4 »

All times are UTC+11:00


Who is online

Users browsing this forum: No registered users and 11 guests


You cannot post new topics in this forum
You cannot reply to topics in this forum
You cannot edit your posts in this forum
You cannot delete your posts in this forum
You cannot post attachments in this forum

Jump to: 

Powered by phpBB® Forum Software © phpBB Limited