Ozdat Home Feature Cars Ozdat Classifieds Event Calander Links Trade Link Tech Resource Merchandise Donate Web Mail
It is currently Mon Apr 29, 2024 11:56 pm

All times are UTC+11:00


Post new topic  Reply to topic  [ 212 posts ]  Go to page « 16 7 8 9 1015 »
Author Message
 Post subject: Re: Hatchmans 1600 Build
PostPosted: Fri Dec 26, 2014 9:28 am 
Offline
User avatar

Joined: Sun Sep 04, 2011 10:56 am
Posts: 404
Location: Belco, act
nice!!!!!!!!!!!!!!

_________________
tradesafe: Dazda, 2ndTimeStanza, Qeleh, big mac, hatchman


1979 Datsun Sunny Wagon 13b Turbo conversion: http://ozdat.com/forum/viewtopic.php?f=60&t=28890


Top
   
 Post subject: Re: Hatchmans 1600 Build
PostPosted: Fri Dec 26, 2014 12:23 pm 
Offline
User avatar

Joined: Wed Jun 01, 2011 1:43 pm
Posts: 364
Location: San Francisco, CA
So.......... after a bit of wrangling we've decided not to "Ratsun" it as there is no way that pod filter is going to work mounted behind the light as the bend in the hose to the airbox is going to be too sharp. Linkage for the Webers has also been done - we used a simple bike gear cable but we haven't done the choke yet. Very tight under foot too, may need to put a little bit more slack in it

So for now the airbox and filter will sit like this - airbox painted in the same colour scheme too - hopefully the bonnet will close!

[ img ]

Our two 1600's in the garage at the moment. Lucille (the black one) needs some repairs, the little nib that attaches the coolant hose to the carbie has broken on the side of the thermostat so we need to fix it. I never realised that coolant was routed through the carburettor.

[ img ]

And while in Toys R Us in Frankston last weekend looking for some Hot Wheels cars for my boy from Santa look what I found :D

[ img ]

_________________
Current Garage:

1971 Datsun 1600
2019 Mazda 6 Touring Wagon
2009 Holden SV6 Sedan


Top
   
 Post subject: Re: Hatchmans 1600 Build
PostPosted: Sat Jan 10, 2015 1:41 pm 
Offline
User avatar

Joined: Wed Jun 01, 2011 1:43 pm
Posts: 364
Location: San Francisco, CA
Another view of the thermal fan and the alternator now fitted and belted

[ img ]

Temp switch for the thermal fan now mounted

[ img ]

Finally bolted the engine plate on

[ img ]

Dad wants to put a 510 badge here, got to admit I hate it! What does everyone else think?

[ img ]

Rain grill, all re-chromed

[ img ]

Wiper motor, nicely re-chromed and painted

[ img ]

_________________
Current Garage:

1971 Datsun 1600
2019 Mazda 6 Touring Wagon
2009 Holden SV6 Sedan


Top
   
 Post subject: Re: Hatchmans 1600 Build
PostPosted: Sat Jan 10, 2015 8:21 pm 
Offline
User avatar

Joined: Mon Aug 05, 2013 5:47 pm
Posts: 289
Location: Melbourne
Bloody love this build!


Top
   
 Post subject: Re: Hatchmans 1600 Build
PostPosted: Sun Jan 11, 2015 9:54 pm 
Offline
Donating Member
Donating Member
User avatar

Joined: Wed Feb 18, 2004 4:13 pm
Posts: 608
yea this is looking great!


Top
   
 Post subject: Re: Hatchmans 1600 Build
PostPosted: Mon Jan 19, 2015 8:34 pm 
Offline
User avatar

Joined: Wed Jun 01, 2011 1:43 pm
Posts: 364
Location: San Francisco, CA
The Datto is off getting the fuel and brake lines done this week. The fuel line in it originally was all made of rubber and was actually routed inside the front wheel arch. Probably not the safest of modifications so we're going to get steel ones made up and routed to suit the Webers. Also will get the brakes done at the same time.

Sure is awesome when your best mate has a tow truck business!

So while the car is getting a bit of love we've tidied up the dash and bits using a bit of this

[ img ]

And it comes up looking pretty good. This is the SS ignition console I ordered from Japan

[ img ]

Instrument cluster

[ img ]

Radio

[ img ]

Glove box

[ img ]

Yep even inside the glove box

[ img ]

And here is the gauges cluster that we're going to locate below the radio

[ img ]

More news when gets back

On another note the RACV car show at Mornington Racecourse on Sunday was really good. Gullwing 300SL, Bentley Speed 6 and some other really exotic classic cars.

Plus just one 1600 that was still getting a bit of interest. Think we may have to get our one up to this next year

_________________
Current Garage:

1971 Datsun 1600
2019 Mazda 6 Touring Wagon
2009 Holden SV6 Sedan


Top
   
 Post subject: Re: Hatchmans 1600 Build
PostPosted: Mon Jan 19, 2015 8:57 pm 
Offline
User avatar

Joined: Sun Jul 04, 2010 10:18 am
Posts: 1571
Nice work there mate, dash came up a treat.

Could you get some reflection on the windscreen when driving from the wiper cowl?

Cheers,

Trent

_________________
1600 Build: http://ozdat.com/forum/viewtopic.php?f=59&t=22694


Top
   
 Post subject: Re: Hatchmans 1600 Build
PostPosted: Mon Jan 19, 2015 9:01 pm 
Offline
User avatar

Joined: Wed Jun 01, 2011 1:43 pm
Posts: 364
Location: San Francisco, CA
Hmmm hadn't thought of that!

I hope not!


Top
   
 Post subject: Re: Hatchmans 1600 Build
PostPosted: Mon Jan 19, 2015 10:45 pm 
Offline
User avatar

Joined: Mon Aug 05, 2013 5:47 pm
Posts: 289
Location: Melbourne
Came up awesome mate. What colour was that you used?


Top
   
 Post subject: Re: Hatchmans 1600 Build
PostPosted: Tue Jan 20, 2015 7:37 am 
Offline
User avatar

Joined: Wed Jun 01, 2011 1:43 pm
Posts: 364
Location: San Francisco, CA
Grey one mate, we chose that colour so it matches the grey we chose for the interior - will check what the actual name is for you

_________________
Current Garage:

1971 Datsun 1600
2019 Mazda 6 Touring Wagon
2009 Holden SV6 Sedan


Top
   
 Post subject: Re: Hatchmans 1600 Build
PostPosted: Wed Feb 25, 2015 3:15 pm 
Offline
User avatar

Joined: Wed Jun 01, 2011 1:43 pm
Posts: 364
Location: San Francisco, CA
Okay so a bit more of an update. We've had the fuel and brake lines all done and the exhaust has all been plumbed in now too

Fuel line from the pump

[ img ]

Fuel lines running under the car plus the exhaust. Previously it was mostly rubber so not very safe or durable

[ img ]

Malpassi fuel regulator for the Webers now connected to the fuel line. The 1600 has an electric fuel pump and I'm not 100% certain how much volume it can push. It was used for the stroked Frankenturbo motor so given that I'm thinking it will provide more than we need (although the suck through turbo on that engine ran off a single SU carby)

[ img ]

Brake line

[ img ]

Couple of pictures of the exhaust

[ img ]

[ img ]


So now we need to finish off the fuel line plumbing to the carbs and then get things wired up to make sure fuel is getting in there and it can at least crank over. After that it will be off to APS in Frankston to get everything re-tuned on a dyno and then back home to finish everything off. End is kind of in sight now, hopefully the old girl will be cherry ripe for the classic Japan show at the start of summer

_________________
Current Garage:

1971 Datsun 1600
2019 Mazda 6 Touring Wagon
2009 Holden SV6 Sedan


Top
   
 Post subject: Re: Hatchmans 1600 Build
PostPosted: Sat Apr 04, 2015 1:35 pm 
Offline
User avatar

Joined: Wed Jun 01, 2011 1:43 pm
Posts: 364
Location: San Francisco, CA
G'day all

Bit of good news recently. We hooked up the starter motor, removed the plugs and cranked her over. Good news is that the motor turns over and when we put it in gear the back wheels turned happily too - all done without bad noises, grinding and so on

But now the real fun begins

[ img ]

Sorting out all the goddamn, motherf&^ing wiring!

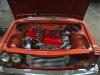
We've done a fair bit, multi-meters are a godsend but we're kind of confused about the coil - which is kind of embarrassing I know they aren't that complicated!

The pic below shows a black wire in question and the next picture is the wiring diagram from the Gregory's auto-shop book for the Aussie Datsun 1600

[ img ]

[ img ]

Now looking at that diagram in the top middle the little icon that looks like an engine with the number 10 in it is the dizzy. And as best I can tell the black wire must be the one that goes to the power because the green and pink ones are attached to the dizzy permanently. For reference the dizzy is a S2 Bluebird electronic one - not the points one that the 1600 came out with.

It's confusing however as I normally associate black with earth and the diagram shows the dizzy being earthed - and I'm not suer if the black wire is earth or to power :|

So can someone help a brother out here and tell me where that little black wire goes from the coil for an S2 Bluebird dizzy on a L20B.....?

_________________
Current Garage:

1971 Datsun 1600
2019 Mazda 6 Touring Wagon
2009 Holden SV6 Sedan


Top
   
 Post subject: Re: Hatchmans 1600 Build
PostPosted: Tue Apr 07, 2015 1:54 pm 
Offline
User avatar

Joined: Wed Jun 01, 2011 1:43 pm
Posts: 364
Location: San Francisco, CA
Sorted, apparently it is the tacho pickup

_________________
Current Garage:

1971 Datsun 1600
2019 Mazda 6 Touring Wagon
2009 Holden SV6 Sedan


Top
   
 Post subject: Re: Hatchmans 1600 Build
PostPosted: Wed Apr 08, 2015 1:53 pm 
Offline
Donating Member
Donating Member

Joined: Wed Jul 08, 2009 7:33 pm
Posts: 467
Location: on the computer
Sweet dude!
When she getting fired up?
What size exhaust did u get?

_________________
When the sign says "don't feed the bears", man you better not feed the bears.


Top
   
 Post subject: Re: Hatchmans 1600 Build
PostPosted: Thu Apr 09, 2015 10:32 am 
Offline
User avatar

Joined: Wed Jun 01, 2011 1:43 pm
Posts: 364
Location: San Francisco, CA
Hopefully around springtime mate, all the big jobs are done so its just the fiddly crap now.

Exhaust is 2"

_________________
Current Garage:

1971 Datsun 1600
2019 Mazda 6 Touring Wagon
2009 Holden SV6 Sedan


Top
   
Display posts from previous:  Sort by  
Post new topic  Reply to topic  [ 212 posts ]  Go to page « 16 7 8 9 1015 »

All times are UTC+11:00


Who is online

Users browsing this forum: No registered users and 9 guests


You cannot post new topics in this forum
You cannot reply to topics in this forum
You cannot edit your posts in this forum
You cannot delete your posts in this forum
You cannot post attachments in this forum

Jump to: 

Powered by phpBB® Forum Software © phpBB Limited