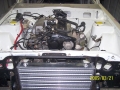
I molested the car a bit on the weekend...
This is what I started with:
![[ img ]](http://members.iinet.net.au/~joel_amy/Joel/Images/Cars/THE%20BLUEBIRD/BURUBADO/06.04.10/Image0604.jpg)
installed some of these:
![[ img ]](http://members.iinet.net.au/~joel_amy/Joel/Images/Cars/THE%20BLUEBIRD/BURUBADO/07.06.10/Image0764.jpg)
which are for these:
![[ img ]](http://members.iinet.net.au/~joel_amy/Joel/Images/Cars/THE%20BLUEBIRD/BURUBADO/07.06.10/Image0765.jpg)
Nice and snug, will probably make a new hole below the light hole and stick a grommet in there for the wires to go thru. But for now, pretty tidy.
![[ img ]](http://members.iinet.net.au/~joel_amy/Joel/Images/Cars/THE%20BLUEBIRD/BURUBADO/07.06.10/Image0766.jpg)
A couple of people have asked me to make some for them.
no, I won't, but this guide may help you make your own.
Buy a pair of crystal housings, you need the clear front ones, not the bumpy ones otherwise it will **** up your light patterns. Get ones with a metal backing too - it's easier to work with. Oh, and a GLASS lens!!!! HID lights will make plastic lenses turn into soup. Also, make sure the locating tabs on the back fit your car's housings, if they don't grind them back so it's flat.
![[ img ]](http://members.iinet.net.au/~joel_amy/Joel/Images/Cars/THE%20BLUEBIRD/BURUBADO/07.06.10/Image0767.jpg)
![[ img ]](http://members.iinet.net.au/~joel_amy/Joel/Images/Cars/THE%20BLUEBIRD/BURUBADO/07.06.10/Image0768.jpg)
pop the **** in the oven at about 80 degrees (pre-heat it)
![[ img ]](http://members.iinet.net.au/~joel_amy/Joel/Images/Cars/THE%20BLUEBIRD/BURUBADO/07.06.10/Image0770.jpg)
it went in at this time:
![[ img ]](http://members.iinet.net.au/~joel_amy/Joel/Images/Cars/THE%20BLUEBIRD/BURUBADO/07.06.10/Image0769.jpg)
and out at this time:
![[ img ]](http://members.iinet.net.au/~joel_amy/Joel/Images/Cars/THE%20BLUEBIRD/BURUBADO/07.06.10/Image0771.jpg)
the trick is to get the glue soft so you can pull them apart - if the glue is roasted, chances are you will **** up the lights, make your house stink, burn yourself and have an angry mrs.
Use some pretty pink gloves unless you're an idiot and like burnt fingers
![[ img ]](http://members.iinet.net.au/~joel_amy/Joel/Images/Cars/THE%20BLUEBIRD/BURUBADO/07.06.10/Image0772.jpg)
A small, flat blade screwdriver or chisel will allow you to gently pry them apart.
If this isn't easy, then heat it for longer, otherwise you'll break the glass.
![[ img ]](http://members.iinet.net.au/~joel_amy/Joel/Images/Cars/THE%20BLUEBIRD/BURUBADO/07.06.10/Image0773.jpg)
Tada!
![[ img ]](http://members.iinet.net.au/~joel_amy/Joel/Images/Cars/THE%20BLUEBIRD/BURUBADO/07.06.10/Image0774.jpg)
Remove the bulb cover if you have one.
![[ img ]](http://members.iinet.net.au/~joel_amy/Joel/Images/Cars/THE%20BLUEBIRD/BURUBADO/07.06.10/Image0775.jpg)
Time for lunch while they cool down.
Steamed pork buns. yum. I steamed these while i baked the reflectors.
![[ img ]](http://members.iinet.net.au/~joel_amy/Joel/Images/Cars/THE%20BLUEBIRD/BURUBADO/07.06.10/Image0776.jpg)
I played an advanced level on portal while i waited too, but that's optional.
If you are keeping the reflector chrome, be careful not to scratch the chrome when you remove the glue, also, if you have a cat, ensure she does not eat the glue like mine tried to
![[ img ]](http://members.iinet.net.au/~joel_amy/Joel/Images/Cars/THE%20BLUEBIRD/BURUBADO/07.06.10/Image0777.jpg)
The H4 holder ring is no longer required, so remove it. I squished it in my vice

my bench is so messy

![[ img ]](http://members.iinet.net.au/~joel_amy/Joel/Images/Cars/THE%20BLUEBIRD/BURUBADO/07.06.10/Image0778.jpg)
nicely squished
![[ img ]](http://members.iinet.net.au/~joel_amy/Joel/Images/Cars/THE%20BLUEBIRD/BURUBADO/07.06.10/Image0779.jpg)
and removed
![[ img ]](http://members.iinet.net.au/~joel_amy/Joel/Images/Cars/THE%20BLUEBIRD/BURUBADO/07.06.10/Image0780.jpg)
Use tin snips to chop into it like this, then bend the tabs up to make it easier to cut.
Don't cut them too big, you can always remove more, but you can't add it back on.
![[ img ]](http://members.iinet.net.au/~joel_amy/Joel/Images/Cars/THE%20BLUEBIRD/BURUBADO/07.06.10/Image0781.jpg)
chomp chomp chomp
![[ img ]](http://members.iinet.net.au/~joel_amy/Joel/Images/Cars/THE%20BLUEBIRD/BURUBADO/07.06.10/Image0782.jpg)
poke your projector thru, chances are you will need to chop off a bit more, but that's easy now because of the larger hole. If you have an angel eye ring or something, chances are you will need to cut a little extra off in one spot for the wires like i had to.
![[ img ]](http://members.iinet.net.au/~joel_amy/Joel/Images/Cars/THE%20BLUEBIRD/BURUBADO/07.06.10/Image0783.jpg)
oh sh*t the cat's eating the metal tabs i cut off!
![[ img ]](http://members.iinet.net.au/~joel_amy/Joel/Images/Cars/THE%20BLUEBIRD/BURUBADO/07.06.10/Image0784.jpg)
No kitty! (omnomnomnom)
![[ img ]](http://members.iinet.net.au/~joel_amy/Joel/Images/Cars/THE%20BLUEBIRD/BURUBADO/07.06.10/Image0785.jpg)
This is how fits together once it's all in place.
You can see how the glass sits about a mm above the reflector because of the projetor lens - this is OK!
![[ img ]](http://members.iinet.net.au/~joel_amy/Joel/Images/Cars/THE%20BLUEBIRD/BURUBADO/07.06.10/Image0786.jpg)
Snug-ish. If there are some gaps, it's all good, as long as you can't see it from the front
![[ img ]](http://members.iinet.net.au/~joel_amy/Joel/Images/Cars/THE%20BLUEBIRD/BURUBADO/07.06.10/Image0787.jpg)
If you don't want the reflector to be chrome, now is the time to paint it! You could paint it black, or body coloured, or anything. I just kept them chrome, I want it to look somewhat factory.
Now, you need some knead-it stuff. You squish it together until the colour is even and then it hardens in about 20 minutes, This will be used for two purposes, to hold the projector in place and to seal the back from moisture/dust etc.
The cat wanted to eat this too, but I didn't have much left so no kitty, not this time!
![[ img ]](http://members.iinet.net.au/~joel_amy/Joel/Images/Cars/THE%20BLUEBIRD/BURUBADO/07.06.10/Image0788.jpg)
If your projector has a plastic coating, pull it off now.
Clean the reflector to get rid of finger prints etc and use a rag so you don't get anything dirty with knead-it fingers.
Once the reflector is in place and sitting level, start to squish the knead-it in place, really work it in the gaps.
You can see the angel eye wire and the appropriate cut out here too.
![[ img ]](http://members.iinet.net.au/~joel_amy/Joel/Images/Cars/THE%20BLUEBIRD/BURUBADO/07.06.10/Image0789.jpg)
Put it all around to seal it properly, you can get it smooth in a second, just get it on there for now.
![[ img ]](http://members.iinet.net.au/~joel_amy/Joel/Images/Cars/THE%20BLUEBIRD/BURUBADO/07.06.10/Image0790.jpg)
Smooth it out )remember you won't be able to see it anyway, you just want it flat enough that it won't foul the backing plate on your car. Once it's smoothed out to your liking, sit it somewhere where it is suspended by the housing, not the prrojector.
The last thing you wnat is for the projector to move and be on a funny angle.
I just used the projector packaging. Sorry about the dark photo.
![[ img ]](http://members.iinet.net.au/~joel_amy/Joel/Images/Cars/THE%20BLUEBIRD/BURUBADO/07.06.10/Image0791.jpg)
The projectors likely came with sealant for putting it back together. If it didn't you need to make sure it won't be affected by heat otherwise your lens may go cloudy. Remember, HID gets a lot hotter than normal H4 bulbs!
Only use enough selaant to just seal the gap between the glass and the reflector, if you put too much on, it will squish into the reflector area and it will look sh*t, you will need to pull it apart and clean it all off which is annoying - i did it on my first one and it was awful. So learn from my mistake!
![[ img ]](http://members.iinet.net.au/~joel_amy/Joel/Images/Cars/THE%20BLUEBIRD/BURUBADO/07.06.10/Image0792.jpg)
Nice little seal. But it won't be enough to hold it in place.
![[ img ]](http://members.iinet.net.au/~joel_amy/Joel/Images/Cars/THE%20BLUEBIRD/BURUBADO/07.06.10/Image0793.jpg)
For this i used high quality electrical tape. Wound tightly around the lens and reflector, it holds everything firmly in place. I wanted the black to go to the edge, you can sit it back further if you like.
![[ img ]](http://members.iinet.net.au/~joel_amy/Joel/Images/Cars/THE%20BLUEBIRD/BURUBADO/07.06.10/Image0794.jpg)
Like a bought one
When the knead-it is hard you can paint it, but I didn't bother, you can't see it anyway and I was out of satin black!
![[ img ]](http://members.iinet.net.au/~joel_amy/Joel/Images/Cars/THE%20BLUEBIRD/BURUBADO/07.06.10/Image0795.jpg)
I also installed clear inner lights, still need to make them yellow, but can't find glass stain aerosol!
![[ img ]](http://members.iinet.net.au/~joel_amy/Joel/Images/Cars/THE%20BLUEBIRD/BURUBADO/07.06.10/Image0796.jpg)
Let's put the grill back on and see how it looks....
![[ img ]](http://members.iinet.net.au/~joel_amy/Joel/Images/Cars/THE%20BLUEBIRD/BURUBADO/07.06.10/Image0797.jpg)
![[ img ]](http://members.iinet.net.au/~joel_amy/Joel/Images/Cars/THE%20BLUEBIRD/BURUBADO/07.06.10/Image0798.jpg)
Beautiful!
![[ img ]](http://members.iinet.net.au/~joel_amy/Joel/Images/Cars/THE%20BLUEBIRD/BURUBADO/07.06.10/Image0799.jpg)
All done, have fun. This is just a guide, if you **** it up, it's your own fault.
These are the housings I used, you will need a HI/LO type if you want the one light to do high and low beam. They have a motor inside to change the beam.
These kits require a ballast, you will need to purchase them seperately off the seller. Make sure you clearly specify the frequency of light you want as well as the colour of the angel eye.
http://cgi.ebay.com.au/9005-9006-Bi-xen ... 1e59275ee1
I don't think this is the same seller that I used, but it is the same product. Cheaper now than when I bought them two years ago too...
Hope this helps!

![[ img ]](http://img.photobucket.com/albums/v471/Nebuchernezzer/DatsunSilviaSig.jpg)


![[ img ]](http://www.ozdat.com.au/forum/imagecache/nswdatubarjk3.png)
![[ img ]](http://www.ozdat.com.au/forum/imagecache/blackkeysbyhavokms2.jpg)
![[ img ]](http://www.ozdat.com.au/forum/imagecache/ubd9704ld0.png)
![[ img ]](http://www.ozdat.com.au/forum/imagecache/ubd6281mf8.png)
![[ img ]](http://members.iinet.net.au/~joel_amy/Joel/Images/Cars/THE%20BLUEBIRD/BURUBADO%202011/13.01.11/Image0287.jpg)
![[ img ]](http://members.iinet.net.au/~joel_amy/Joel/Images/Cars/THE%20BLUEBIRD/BURUBADO%202011/13.01.11/Image0288.jpg)